Deploying state-of-the-art object detectors (DETRs) to AWS.
Forget about YOLO. Transformer-based models are better now and easy to deploy!
TL;DR: We use the awesome new transformer-based object detector D-FINE to create a custom image and use it for batch processing and model serving in AWS. We also performed inference tests for CPU/GPU and saw that you can achieve around 60% average precision on COCO in under 100ms per image. The code for deploying to AWS is in the aws_utils.py classes.
SOTA of object detection
Object detection is still a very popular task in computer vision, even with the introduction of large visual language models. That’s because, in most scenarios, we need to analyze the image quickly, on cheap hardware, and optimize for a particular set of objects via fine-tuning.In recent years, YOLO has been the most popular detector architecture for object detection, and it currently has 11 different versions from different people (I guess people like the name and use it to promote their detectors).
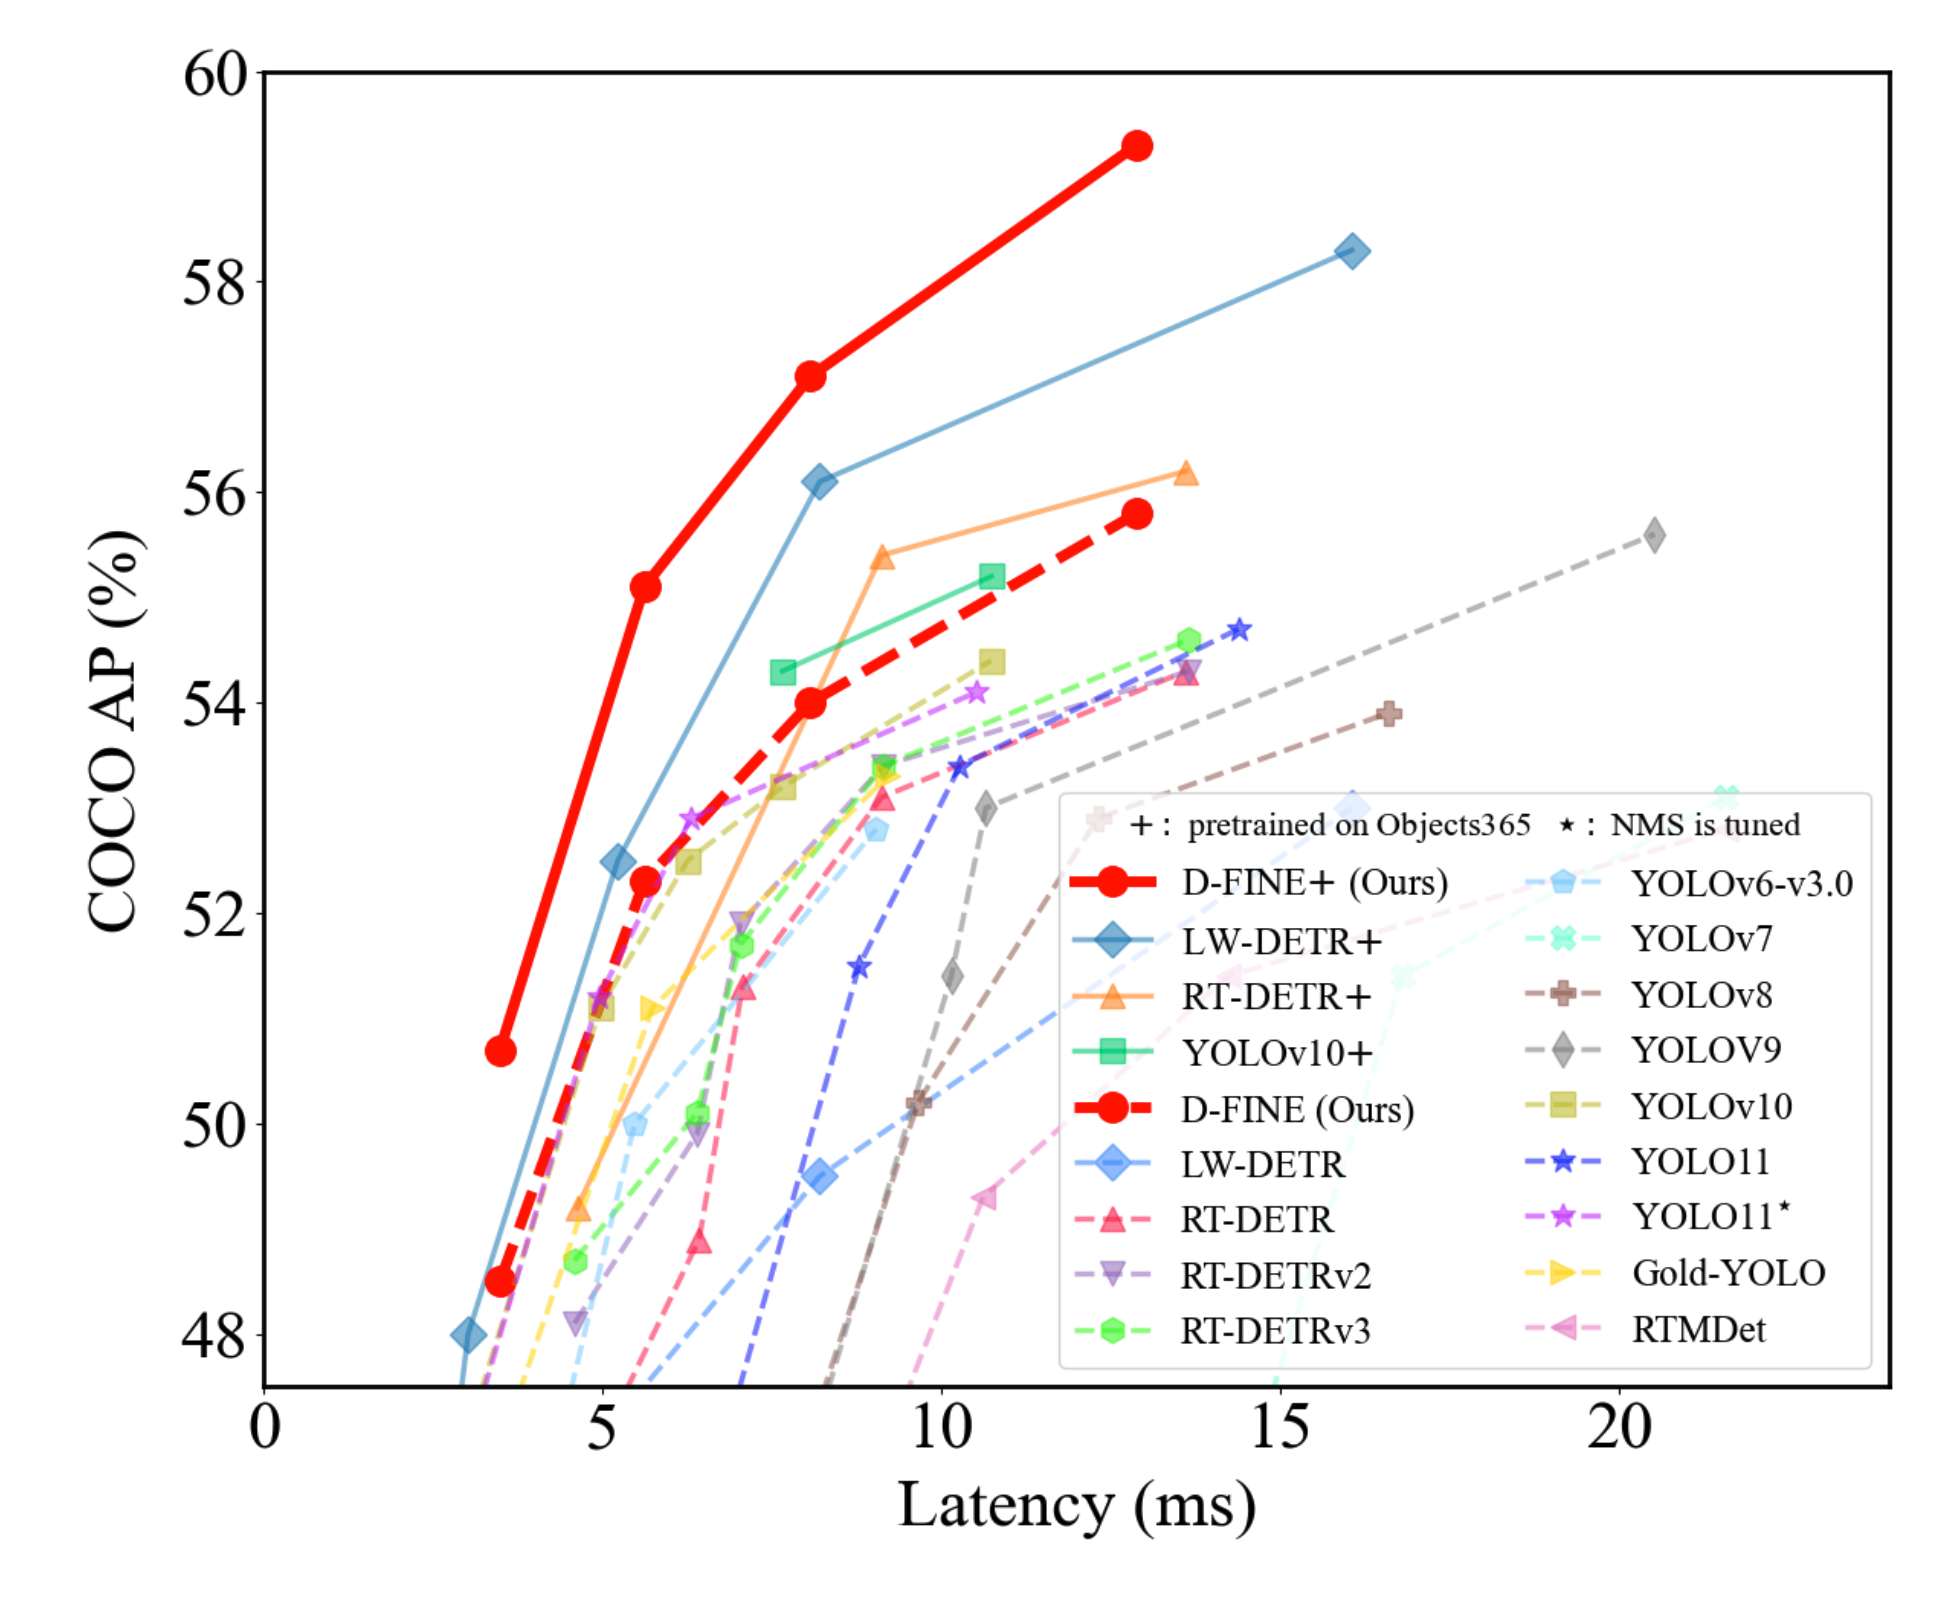
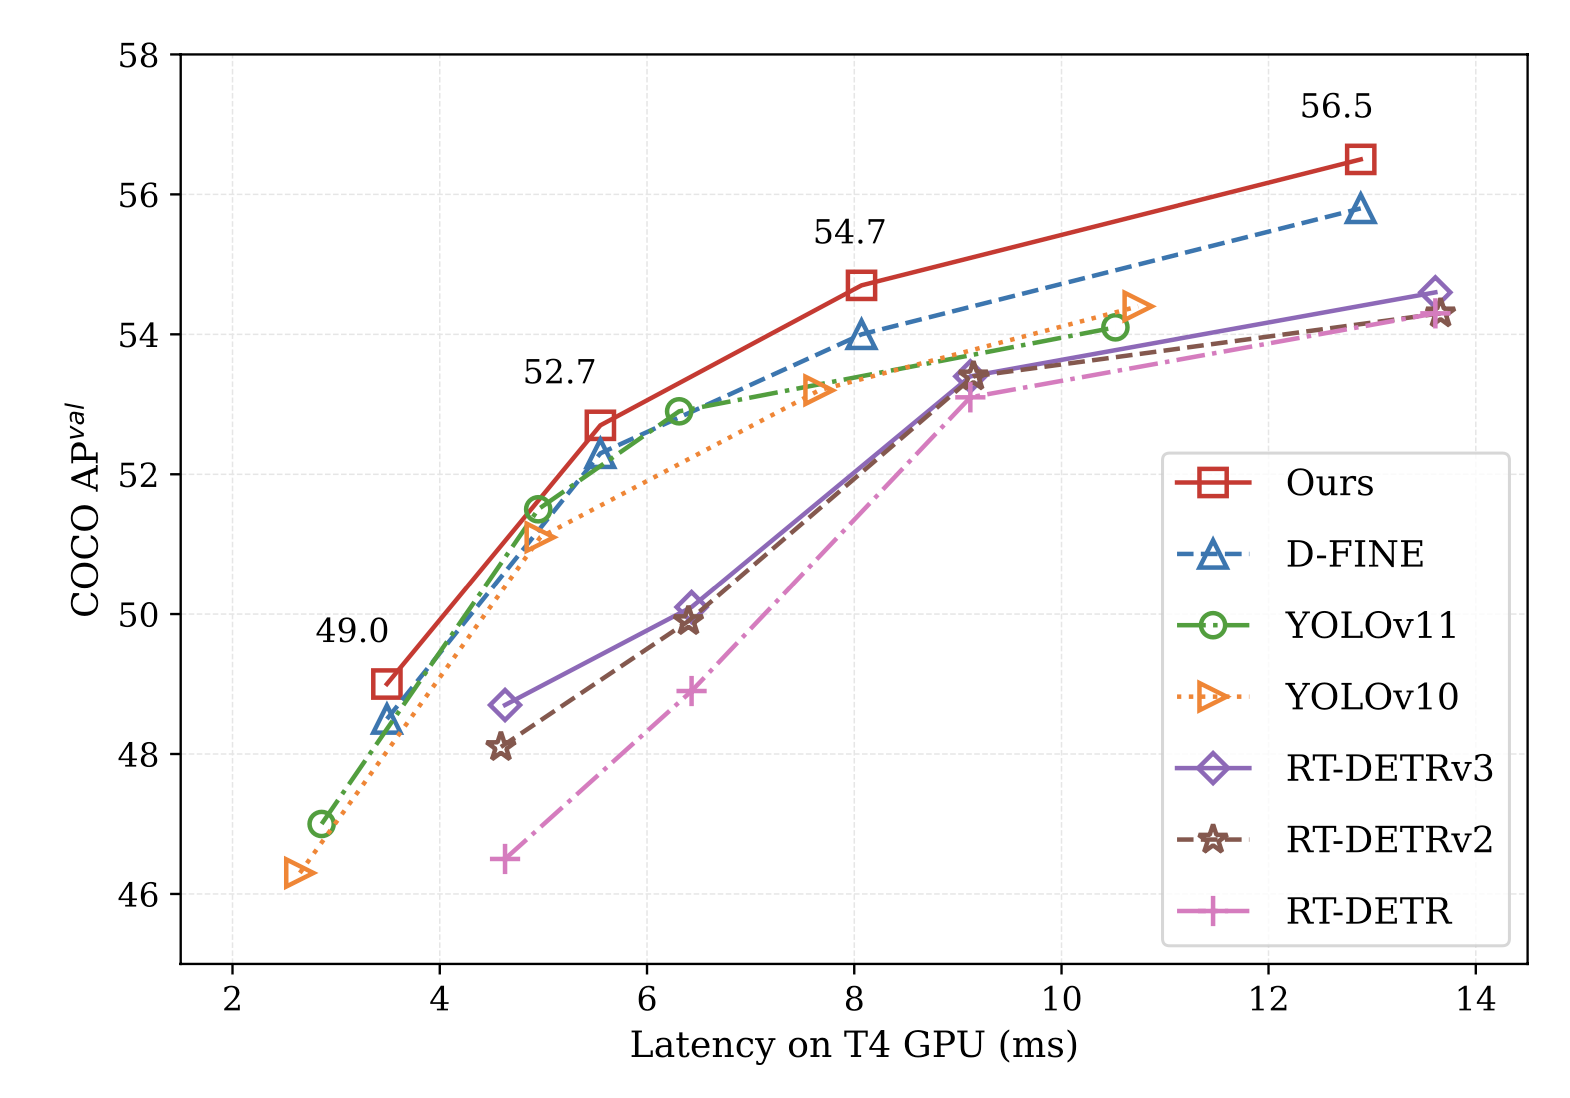
Ultralytics has been the most prominent provider of YOLO models, providing an easy-to-use interface for different ML frameworks. However, the commercial license used is a big issue for most applications, so people are looking for Apache-licensed alternatives. As is often the case, the answer comes from the research community. Detection based on transformers is now outperforming YOLO models at the same parameter count (and inference times), a trend that began with RT-DETR [3]. The work that started with the original DETR paper [4] in 2020 has been perfected, and in the last few months, we got two additional models that are beating YOLO in performance: D-FINE [1] and DEIM [2]. Check out the graphs I took from the papers:


Our objective
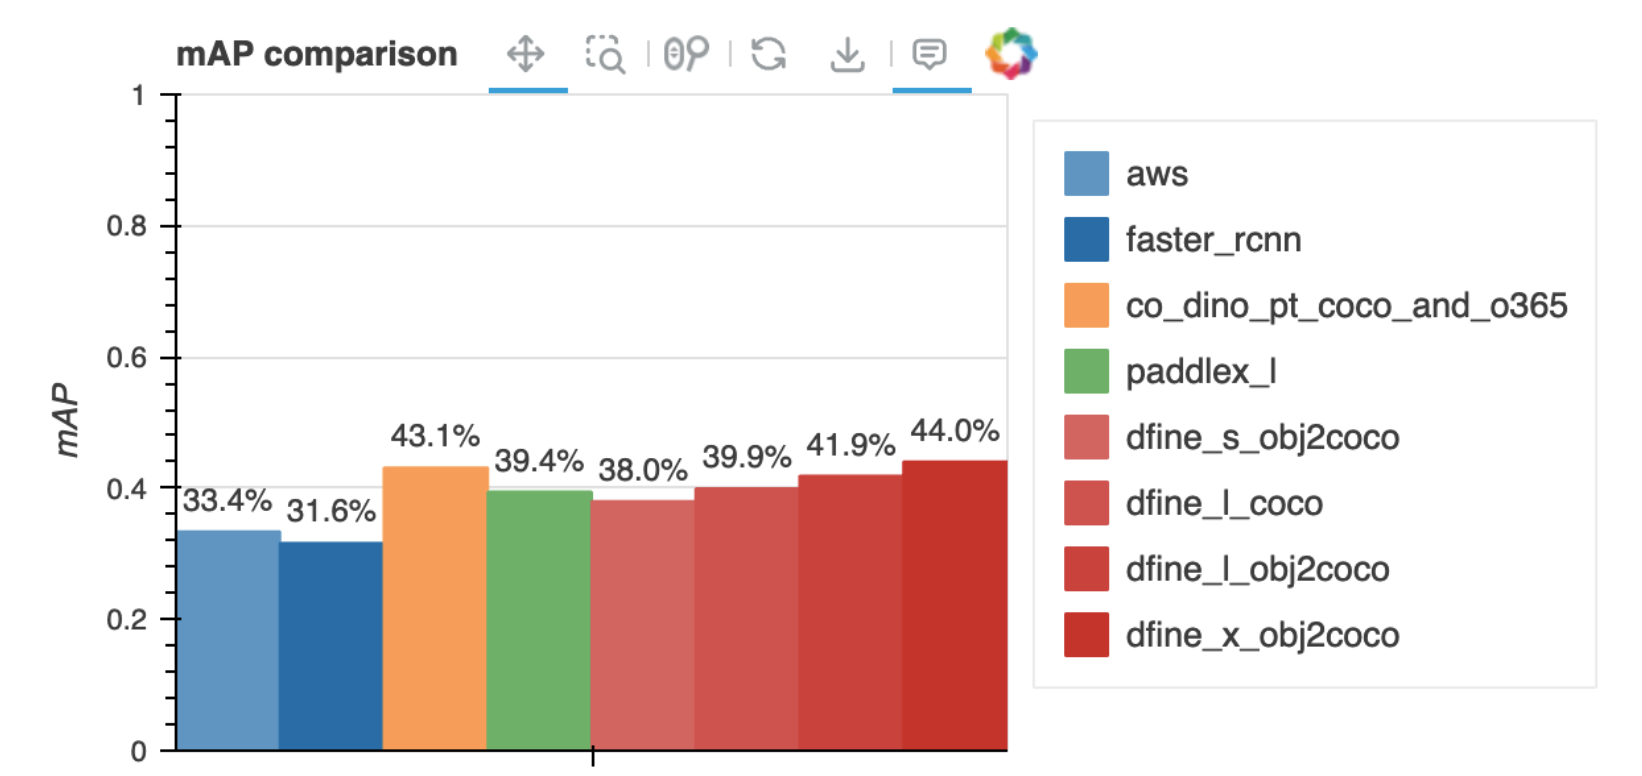
In this, we’re going to focus on D-FINE models, since they have a very nice interface, based on PyTorch. If you can, star the project on GitHub.The context where I deployed these models was a challenging surveillance scenario, aiming to detect people in low resolution, low lighting, and occasional occlusions. It’s always a good idea to test on your own dataset, since the common benchmark COCO might not translate well to your scenario. I did exactly that – check out the average precision in my data:


D-FINE performs amazingly, especially if we consider that all its versions are way smaller than, let’s say, the Co-DINO model tested. In my case, I chose to deploy these D-FINE models trained on COCO, ignoring classes other than “person” for now.
Generating a multi-purpose Docker image
Usually, the first step to using cloud ML services – and also a generally good idea – is to create your own Docker image for model inference. Here, there is a caveat: we want to use this model for both batch processing (with AWS Batch) and serving (with SageMaker). Using two different Docker images would be a pain, so we created a bash script (called serve) as an entry point to determine whether a script should run for a batch of images or if a Flask app should start to serve the model. Here’s the Dockerfile:
FROM registry.cn-hangzhou.aliyuncs.com/peterande/dfine:v1

WORKDIR /workspace/

RUN git clone https://github.com/Peterande/D-FINE.git && \
    cd D-FINE && \
    pip install -r requirements.txt && \
    pip install -r tools/inference/requirements.txt && \
    pip install opencv-python tqdm

RUN pip install Flask opencv-python numpy requests Pillow flask-cors sagemaker-inference gunicorn

COPY dfine_checkpoints /workspace/dfine_checkpoints
COPY *.py /workspace/
COPY serve /usr/bin/serve
RUN chmod +x /usr/bin/serve

ENV PYTHONUNBUFFERED=1
ENV SAGEMAKER_PROGRAM=/workspace/app.py

EXPOSE 8080

ENTRYPOINT ["serve"]
Btw, serve, without .sh extension, is the expected name for a SageMaker custom model. The common parameters for the two running modes are the device (“cpu” or “cuda:x”), model configuration, and model checkpoint file. These parameters are kept in environment variables, making it easy to customize when deploying to SageMaker. The script looks like this:
#!/bin/bash

export CONFIG_FILE=${CONFIG_FILE:-"/workspace/D-FINE/configs/dfine/objects365/dfine_hgnetv2_x_obj2coco.yml"}
export CHECKPOINT_FILE=${CHECKPOINT_FILE:-"/workspace/dfine_checkpoints/dfine_x_obj2coco.pth"}
export DEVICE=${DEVICE:-"cpu"}  # Default to CPU if DEVICE is not set

# Check if --batch is the first argument
if [[ "$1" == "--batch" ]]; then
    echo "Running batch mode..."
    # Shift to remove the first argument (--batch)
    shift
    python -u /workspace/dfine_batch.py "$@"
else
    echo "Running server mode..."
    gunicorn -w 4 -b 0.0.0.0:8080 \
        --preload \
        --timeout 120 \
        --log-level debug \
        --capture-output \
        --timeout 120 \
        "app:app"
fi
where dfine_batch.py is a simple inference script that runs inference in a batch of images stored on an S3 bucket and app.py is a Flask app that interfaces with the model.
Using the two files above, we can run the image with different parameters and the same entrypoint, so I would highly recommend you do the same. Of course, it’s possible to run this Docker image locally, with or without a GPU. For instance, here’s a sample command for batch processing images from S3 locally:
docker run --rm \
    -v ~/.aws:/root/.aws \
    --gpus all \
    dfine_server \
    --batch \
    --config_file /workspace/D-FINE/configs/dfine/objects365/dfine_hgnetv2_x_obj2coco.yml \
    --checkpoint_file /workspace/dfine_checkpoints/dfine_x_obj2coco.pth \
    --input_s3_dir s3://sample-combined/data/ \
    --output_s3 s3://sample-combined/output_results_computed_in_aws_batch.json
You can also change the behavior of dfine_batch.py so that it gets images locally or does something else.
Deploying the model as AWS Batch Job
AWS Batch jobs are great because they provide reproducible ways of performing inference on different data without having to manage the infrastructure yourself. They usually work by creating an instance for the job, running the job, and then terminating the machines, which is nice and cheap. To submit a job, it’s necessary to create three configurations: the compute environment, the job queue and the job definition. It’s possible to do this in the web interface itself, via the REST API, or using the boto3 Python library. I chose the latter and wrapped all the annoying stuff in the AWSBatchJobClient class in the aws_util.py file. Using this helper class, creating a batch job boils down to:
COMPUTE_IN_GPU = False
batch_job_name = "dfine-inference-job"

instance_type = "c5.large" if not COMPUTE_IN_GPU else "g4dn.xlarge"
subnets = ["subnet-something"]
security_group_ids = ["sg-0f0cd660a60052444"]
instance_role_arn = "arn:aws:iam::something/ecsTaskExecutionRole"
execution_role_arn = "arn:aws:iam::something/BatchJobExecutionRole"
container_props = {
    "image": "container_repo/dfine_server",
    "vcpus": 1,
    "memory": 2048,
    "jobRoleArn": execution_role_arn
}
containerOverrides = {
    "command": [
        "--batch",
        "--device", "cpu",
        "--config_file", "/workspace/D-FINE/configs/dfine/objects365/dfine_hgnetv2_x_obj2coco.yml",
        "--checkpoint_file", "/workspace/dfine_checkpoints/dfine_x_obj2coco.pth",
        "--input_s3_dir", "s3://some-bucket/data/",
        "--output_s3", "s3://some-bucket/output_results_computed_in_aws_batch.json"
    ]
}

from aws_utils import AWSBatchJobClient
aws_batch_client = AWSBatchJobClient("us-east-2")

aws_batch_client.delete_job_queue_if_exists(batch_job_name+"-queue", overwrite=True)
aws_batch_client.create_compute_environment(batch_job_name+"-env", instance_role_arn, instance_type, subnets, security_group_ids, overwrite=True)
aws_batch_client.create_job_queue(batch_job_name+"-queue", batch_job_name+"-env", overwrite=True)
aws_batch_client.create_job_definition(batch_job_name+"-job-def", container_props, overwrite=True)
It may seem like a lot, but you’re mainly configuring how to create your instances (instance_type, subnets, execution_role_arn, etc.) and how to execute your Docker image in containerOverrides. Notice that using the AWSBatchJobClient methods with overwrite=True will delete configurations that exist in your AWS account, wait for them to be deactivated and properly deleted before continuing, so you can iterate quickly with your setup.
AWS SageMaker
SageMaker offers powerful capabilities, including auto-scaling, model monitoring, and seamless integration with other AWS services. To serve a model in SageMaker, you need to implement an API with a few mandatory characteristics:
-
invocations/endpoint: the end-point that will be used for inference (in our case, oject detection). -
health/endpoint: a route that returns 200 so that to check API status. -
EXPOSE 8080: in Dockerfile, you should expose the 8080 port by default. -
servefile: the already mentioned bash script.
Given a container image with the above characteristics, you need to create some definitions, similar to AWS Batch: model, endpoint config, and finally the endpoint.To create the SageMaker model, you need to pass the Docker image’s URI (in ECR), the execution role ARN, and any environment variables you want to pass to the container upon running. The execution role attached to the model should have specific permissions, but you can use AmazonSageMakerFullAccess for debugging – if something is wrong, the model will be stuck at the “Creating” phase. The endpoint config should associate an instance type for the model to run and the endpoint itself only points to the config. Using the SageMakerClient from aws_utils.py, it would look like this:
model_name = "dfine-x-obj2coco"
ecr_image_uri = "ecr_uri/dfine_server:latest"
execution_role_arn = "arn:aws:iam::something:role/service-role/AmazonSageMaker-ExecutionRole"

env_vars = {
    "CHECKPOINT_FILE": "/workspace/dfine_checkpoints/dfine_x_obj2coco.pth",
    "CONFIG_FILE": "/workspace/D-FINE/configs/dfine/objects365/dfine_hgnetv2_x_obj2coco.yml",
    "DEVICE": "cuda:0"
}
instance_type = "ml.g4dn.xlarge"

from aws_utils import SageMakerClient
c = SageMakerClient(region_name="us-east-1")
c.sagemaker_inference_deploy_pipeline(model_name, ecr_image_uri, execution_role_arn, env_vars, instance_type)
Easy, right? In the example above, I’m specifying that the endpoint should be launched in a GPU-enabled machine. For CPU, you need to change the instance type and the DEVICE environment variable.
Inference speed profiling (local vs. AWS SageMaker)
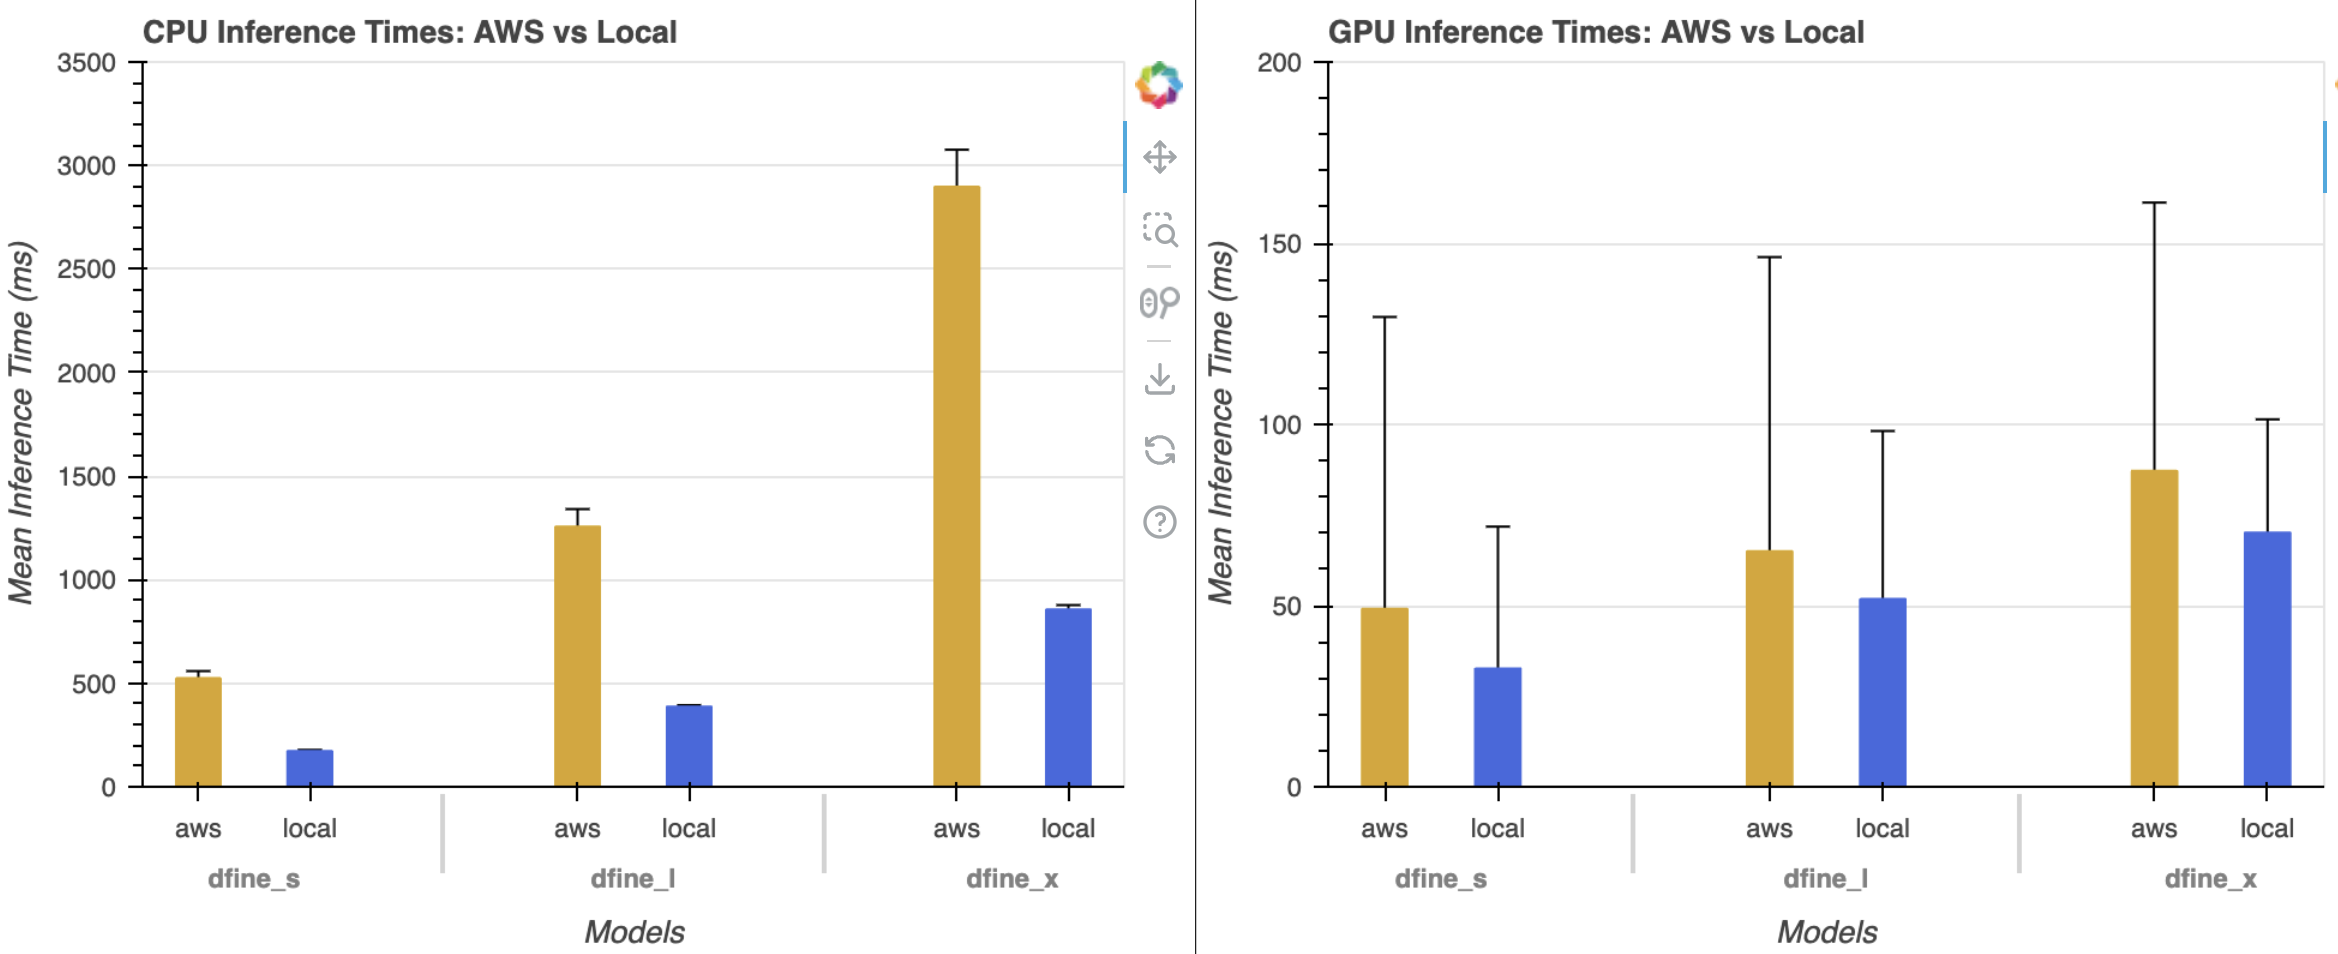
Inference times are important. There are too many GPU types, configurations, and model sizes to take into account, so I created some scripts to test the model’s performance. We tried three model sizes (s, l and x) running locally or on AWS, either GPU or CPU. To compute inference times and standard deviations, 100 requests were made to the API using random COCO val2017 images. Only the inference step was measured to exclude any other I/O latencies. The local machine has a GeForce RTX 2070 and a CPU i7-8700K and the AWS machines used were ml.m5.large for CPU and ml.g4dn.xlarge for GPU.
Here’s the results:

Looking at the CPU results, I would say that only the largest model (dfine_x) is not suitable for production in AWS. However, that may change if different CPU models are evaluated. For GPU performance, all methods are, on average, under 100ms for inference which is incredible – D-FINE-X model, which achieves 59.3% AP on COCO, included. Still, these times can be improved using other frameworks, such as TensorRT or ONNX Runtime.
That’s it
I hope the snippets above help you. Contact me if you have any doubts about reproducing this post. I was surprised by how well D-FINE models behaved both in accuracy and speed, so that might be a game changer for me. I’m currently studying the many papers that stem from the original DETR work and might do a post on that.
References
[1] - Peng, Yansong, et al. “D-FINE: Redefine Regression Task in DETRs as Fine-grained Distribution Refinement.” arXiv preprint arXiv:2410.13842 (2024).
[2] - Huang, Shihua, et al. “DEIM: DETR with Improved Matching for Fast Convergence.” arXiv preprint arXiv:2412.04234 (2024).
[3] - Zhao, Yian, et al. “Detrs beat yolos on real-time object detection.” Proceedings of the IEEE/CVF Conference on Computer Vision and Pattern Recognition. 2024.
[4] - Carion, Nicolas, et al. “End-to-end object detection with transformers.” European conference on computer vision. Cham: Springer International Publishing, 2020.
Enjoy Reading This Article?
Here are some more articles you might like to read next: